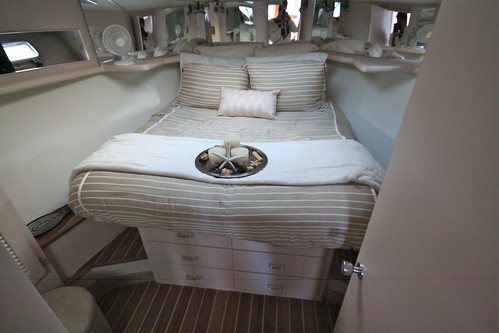
When we purchased the C-Shel back in 2008, we knew there would be many items in need of updating, and upon first look we knew that the carpet in the staterooms and the head would be right at the top of the that list.
The previous owners did a fantastic job picking modern neutral boat carpet for the salon when they replaced the original carpet. However their new installation stopped at the bottom of the companionway stairs. The master and guest staterooms along with the head (that's a washroom for you landlubbers) was still covered in Grey 20 year old carpet. Why a boat builder would put carpet in a head area I will never know. Our goal was to find a replacement and have it installed before the beginning of the next season, spring 2009.
We of course wanted Teak and Holly for the upscale traditional boat look. However, I wasn't keen on the maintenance of real Teak and Holly, I really wanted a synthetic solution that didn't look fake like most laminate and vinyl flooring I have seen.
During the winter we attended the Montreal Boat Show with some good friends. We were hoping to see some floor samples but didn't have high expectations. During our exploration of the show we ran across the NuTeak display. We seen samples of exterior and interior synthetic flooring. We noticed Teak and Holly flooring in the display and asked if it was real. It wasn't. This floor looked so good, so durable, we were sold on the spot. The floor in the NuTeak line is called Seafloor I believe, and I later found out that this product is probably the exact same product as the Amtico interior synthetic decking they use on some cruise ships and high end motor yachts like Hatteras.
In the spring we ordered enough product to cover the square footage of the lower floors of the C-Shel, along with the adhesive, and the adhesive gun. We started to pull the old carpet up at the beginning of March. That's right, I attempted to install this stuff plank by plank with my Father-In-Law. I like to think I'm handy, but those who really know me will tell you that I'm somewhat green. However, I was determined to do this ourselves and save a load of cash in the process, so with the confidence builder my Father-In-Law is, we started.

Head removed, and the old carpet quickly thrown in the dumpster, the next thing we hit was the unforeseen need to level the floor. For added strength, the plywood floor was tabbed with fiberglass to the hull sides. Any texture in the floor, or uneven surfaces would be felt under foot with this 1/8” thick seafloor. We spent one and a half weekends alone, troweling epoxy filler and sanding to make the floor even around the areas of tabbing.
Next stop was to pre-cut all the pieces to fit to the floor before any adhesive could be laid. We nailed a piece of strapping to the plywood floor to mark the center and to use as a straight edge to butt the pieces to, working from the center out. Once one side was fitted with pieces, we moved the center strapping board to the other side of the center line and continued to work from center out on the other side. Though this flooring is fairly easy to work with, it was tedious and long work. It took us many many weekends to complete the cuts.
This stuff comes in strips like hardwood flooring about 3 inches wide and 3 feet long, including the thin holly strips. Straight edges would be cut with a mitre saw, curves and shapes would have to be done with a pair of tin snips, which took a bit of getting use to.
The adhesive part of the installation was the easiest. Lifting big sections of the flooring product off the floor and spreading adhesive then relaying it. All in all it took from the beginning of March to the beginning of May to complete the work, working on the weekends only. I would venture to say I saved thousands of dollars in labor doing this work ourselves, and I have the satisfaction of saying that this unhandy fellow got a little bit handier.
I have no reservations in recommending the NuTeak Seafloor interior synthetic Teak and Holly. It is a wonderful, real looking, durable product, that I am sure I will be pleased with for many years to come. In my opinion, the floors of the C-Shel look much better than even when she first rolled off the assembly line 20+ years ago, and maybe even adds a little value to our Tollycraft 34 Sport Sedan.


